I’d take that Whine anytime

Writer’s Note: This is a continuation of my flashback series about some of my teenage experiences with Challengers in the 1970’s.


If only I had the chance again…


Scanning the local papers for ads became my new religion.

I was getting pretty good at understanding all the cryptic abbreviations, like people trying to fit all the critical data into something smaller than a Twitter post. Little codes like: “stick” “PS” “PB” “dual” “383-2” “440-4″ ‘RT” “dana” “Rally” ” “AC” “disk” “console” “AT” “hemi” ‘6pk” “F60” “SE” “blk int” “needs paint” “needs body” “runs” “6cyl” “conv” “needs mech” “FAST” “dana60” “rblt eng.” “red” “green” “purple” “orange” “blue” “race” “lo mi” “4 sp” “side pipes” “headers” “Holley” “4 bbl” and so on – all these gave you some idea what was out there.

I’d see an ad for a Challenger and then dream about it every day until my dad and I could go check it out.

One time, there was a 1970 R/T with a 340, Plum Crazy purple with a black interior and white vinyl top, and a FOUR SPEED (again!). We went to check her out at a used car lot in Sunnyvale which was about 20 minutes away.

CCS_hacienda

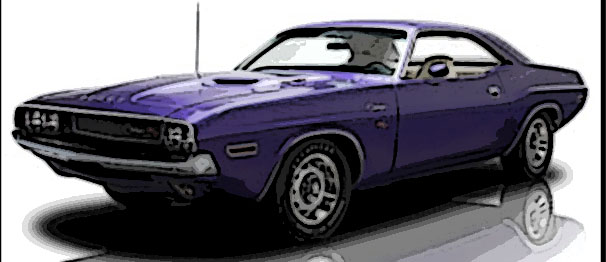
A photo I found on Google and added special effects. It kind of resembles the first Challenger I ever rode in. My dad drove it on a test drive from a used car lot.


I remember this day like it was almost yesterday. The sun was shining, as the awesome purple colored R/T sat menacingly along the sidewalk on the lot of Hacienda Motors, facing El Camino Real like it wanted to tear the road apart.

I was still under-aged and gun shy of powerful 4 speeds, so I let my dad test drive. I thought that was really cool watching dad drive the car. He wasn’t a muscle car nut by my standards, but he enjoyed driving and always seemed to take my interest in Challengers seriously. To a kid growing up, that was a great affirmation that I wasn’t completely insane.

My dad didn’t spend much time with me playing catch or playing games or a lot of things that most people might expect but he did try to meet me where I was with Challengers and that says a lot to me as I look back.

This was the first time I ever rode in a Challenger as my dad had to fiddle with the reverse-lockout pistol grip  four speed shifter. It seemed like this could be a really decent car. Just the “340 Four Barrel” emblem on the scooped hood seemed to make this bad-boy scream ‘I am one ass-kicking muscle car’.

They wanted $2150.

I remember how it started and how great it was to hear the R/T pipes rumble, the symphony of mechanical parts permeating the air. This was no plain car, no way.

As dad got the R/T out onto the local side street, he applied the gas and started shifting gears, revving the engine, and glancing at the tach on the rally dash Everything seemed fine, except for this awful grinding sound that sprang up when we picked up some speed that crescendoed into some coarse mechanical whining that was about as loud as the exhaust.

My heart broke.

We chose not to get the car.

Looking back, the problem may have been a differential simple swap, but we figured we could find something better for the price – something that didn’t have any major problems.

It would sure be nice to have that one. A sweet car with a whine that nowadays couldn’t have been any sweeter.

*

If you enjoyed this post, please LIKE SHARE COMMENT

The Dodge Kid in his youth about 1976. I think I wore this hat everyday through my Freshman year in high school. Photo by Nick Yee

The Dodge Kid in his youth about 1976.

Copyright © 2014 ChallenYee.com. TheDodgeKid.com  All Rights Reserved.

Simmering over 440 Overheating Issues – Part 4

Dealing with the potential roots of my overheating problem Saturday morning I started the relatively simple process of installing my tuned-up radiator but simple as it was, I had plenty of opportunities to slow down and make sure my installation was not going to create more problems. The first thing is to make sure the proper washers are installed to prevent damaging the radiator mounts on the rad and the 22 inch yoke which had been custom drilled for a 26 inch radiator. Once I had the radiator securely in place, my thoughts went to the lower radiator hose.

The old and new hose. New one does not have inside coils.

The old and new hose. New one does not have inside coils- which caused me to start thinking.

TO SPRING OR NOT TO SPRING? I bought a new hose and it doesn’t come with the spring like the old one. I’ve read many points of view on the lower hose spring and some people swear by it and others understand it was a necessary add in to prevent the hose from collapsing during the factory installation of the coolant which was done with a vacuum device to speed up the assembly process. Let me explain why I DID NOT install the old spring, which by the way had become three section, presumably because it had rotted. What I was confronted with was the amount of corrosion build up on the intake to the water pump.

The corrosion residue on the water pump end of the lower hose. The growth is matched on the water pump side. The coils are from the hose, in three pieces.

The corrosion residue on the water pump end of the lower hose. The growth is matched on the water pump side. The coils are from the hose, in three pieces.

Here's the same old hose on the rad end. Clean because I suspect there are no  electrochemical reactions occurring on this end.

Here’s the same old hose on the rad end. Clean because I suspect there are no electrochemical reactions occurring on this end.

YES, OPPOSITES ATTRACT – THEY ATTRACT CRUD For you plumbers out there, or sexual relationship experts, you know if you put two joints together that are dissimilar electrically, you will end up with a corrosive and ultimately a leaking joint. While my lower hose to water pump connection wasn’t leaking before, I believe the hose coil forced up against the water pump caused some electro-chemical reaction that creates this nasty crud (see the photos). The corrosion build up can be easily cleaned off with a wire brush. When you do this DO  NOT BREATHE THIS CRAP as it comes off like dust (I suggest wet it down first to reduce the dust) and wear gloves to protect your hands. It doesn’t take too much imagination that the corrosion from this joint, this little corrosion farm, like atherosclerosis, could have contributed to the crud in my radiator and my entire cooling system. This is basically a reason for your cooling system to have a stroke. So if you are going to use a coil inside your hose, it needs to be electrically neutral and able to handle the hot coolant environment.

Here's the nasty crud build up on the water pump inlet. before I wire brushed it.

Here’s the nasty crud build up on the water pump inlet. before I wire brushed it.

Here's how the coil and the water pump make contact and produce a prodigious amount of crud. Didn't think about this until I started the installation process.

Here’s how the coil and the water pump make contact and produce a prodigious amount of crud. Didn’t think about this until I started the installation process. The new hose, by the way, installed perfectly and was easy to slip on.

COPPER SCREEN – CRUD CATCHER OTF (on the fly) Instructions   The next job was to figure out how to install the copper screen on the upper rad connection. Basically poke the material so it is concave into the input and then use a scissors to trim enough material to fold over the edge of the input pipe so that the hose can hold it in place – but not too much that it interferes with where the clamp cinches down.

Here's how I roughly fit some copper screen into and around the lip of the upper rad inflow pipe. Then trim to size with a scissors.

Here’s how I roughly fit some copper screen into and around the lip of the upper rad inflow pipe. Then trim to size with a scissors.

Here is the copper screen fitted to the upper connection.

Here is the copper screen fitted to the upper connection.

Sliding the hose on and over the copper screen.

Sliding the hose on and over the copper screen.

And with the upper connection fully inserted into the upper hose. Copper screen should not interfere with the area involved with clamping to avoid leaks.

And with the upper connection fully inserted into the upper hose, I am ready to move clamp into position. Copper screen should not interfere with the area involved with clamping to avoid leaks. Ready to catch iron flakes and other debris that can clog the cooling system.

Here's a view of the upper tubes before I added distilled water into the hole.

Here’s a view of the upper tubes before I added distilled water into the filler hole. Compare that to my older photo (PART 2).

TEST DRIVE Preparing Next comes adding distilled water to fill up the radiator, then starting the engine. Adding more water as the level goes down getting sucked by the pump.. I ran the engine without the cap and waited until the thermostat opened up, and the old green coolant began running through the rad.   LET’S ROLL I took the car straight out to the highway and began some high RPM runs. Based on the temperature gauge, the engine was running noticeably cooler with the temperatures rising at a slower pace than before. I have a 5 speed (5th is 1:1) with 2.94 rear gearing so 4th and 3rd gear high speed runs got pretty exciting. The Mopar has a whole different life above 5000 RPM like it can go a lot faster. I still get this weird carb pop, but oddly enough it usually only happens once when I take the car out when I accelerated harder under load, or in a higher gear (depending on car’s the speed)- that’s another problem I need to work on later. Taking the Challenger back home, there were no weird burning smells. I idled the car on the driveway and took some temperature checks with my FLUKE laser thermometer.

After a couple of high RPM stretches on the highway, this is the maximum reading on my rally temp gauge. THe last shop visit including fixing this gauge which wasn't working. For the moment, my life centers around what this gauge does.

After a couple of high RPM stretches on the highway, this is the maximum reading on my rally temp gauge during the test drive and at idle in the driveway on my return. The last shop visit including fixing this gauge which wasn’t working- before fixing (replacing) the gauge, it barely reached the lower normal mark. For the moment, my life centers around what this gauge does.

This is the corresponding laser temp readout from around the thermostat housing with the temp gauge seen in previous photo. (about 218 F) after several high RPM blasts on the highway.

This is the corresponding laser temp readout from around the thermostat housing to the rally temp gauge seen in previous photo. (about 218 F) after several high RPM blasts on the highway.

Corresponding Upper tank temp - about 212F

Corresponding Upper tank temp – about 212F

Corresponding lower tank temp, about 165 F (almost 50 degree difference). But the undeterminable factor is flow potential which is what is improved by the hot tanking and back flushing.

Corresponding lower tank temp, about 165 F (almost 50 degree difference). But the key factor is flow potential which is what is improved by the hot-tanking and back flushing.

THEN the final test….. I turned off the engine.  AND I did not the massive full bottle regurgitation to the overflow unit.  Before, with the problem, the whole thing would fill up because of the overheating, but no longer! What I plan to do now, is drain out the coolant and then after it cools, pull the thermostat, fill up with distilled water again, run the car again then check the copper screen after the next cool down and draining. * * If you enjoyed this post, please LIKE SHARE COMMENT

The Dodge Kid in his youth about 1976. I think I wore this hat everyday through my Freshman year in high school. Photo by Nick Yee

The Dodge Kid in his youth about 1976.

Copyright © 2014 ChallenYee.com. TheDodgeKid.com  All Rights Reserved.

Simmering over 440 Overheating issues – part 3

FIGHTING THE WAR AGAINST CRUD
.
 .
After soaking and rinsing my radiator with 100% distilled white vinegar at least 5 times letting it soak for at least a 1/2 day at a time,  I observed some demineralization but not enough. I could look down into some tubes and see that they were still clogged. I could still see crud at the tops of the tubes as I looked further down the upper tank in either direction from the cap hole.
 .
 So I considered whether I should get a new radiator or take mine to the shop to get it hot tanked or rodded.
 .
It’s tempting to shop for a new radiator especially since there are some much more efficient designs out there that are still stock looking, but sometimes you need to hold back from spending cash.
A local shop in nearby San Carlos recommended by my exhaust system guy.  Photo by Challen

A local shop in nearby San Carlos recommended by my exhaust system guy. Photo by Challen

For financial reasons as well as taking a step by step approach, I took my 3 row 26 inch radiator to a radiator shop called “Howard Ave.” in San Carlos, California, an easy drive in the morning before going to work.
.
Turns out to be the kind of place I would patronize especially when they understand muscle cars and Vanishing Point, the 1971 movie. They frequently perform work on antique and rare pieces as well as run of the mill daily drivers. Plus, they are easily understandable over the phone.
 .
For $88 dollars they hot tanked the radiator, made some minor repairs, put a new coat of paint and provided me some copper screen to use as an upper hose filter.
 .
Talking to the guys about what could be giving me woes made me glad I did not buy a new radiator (at least until I need to rebuild the engine).
 .
.
CAST IRON DISEASE
.
The guys, Rick and Bill, told me a couple of things about the engine blocks cast in the 60’s and early 70’s that I wasn’t aware of.  One, the casting material tended to release metal flakes which build up into crud and; two,  the water pump is positioned high in relation to the engine cooling passages which promote crud build up in the block that is not easy to flush out, that is, unless you pop the freeze plugs and blow out the crud from there.
 .
They said that the crud in my radiator is the residue from the cooling passages in the engine that made it to the radiator and it was likely a long term process. After the hot tanking, they said the radiator flowed much better even though it may seem okay before hot tanking. They managed  to get about 50% better flow after tanking and back flushing.
.
They run a flow test by standing the radiator upright and filling the radiator from the bottom, waiting until the water comes out the input then releasing the bottom to let the water flow out. The distance the water shoots out forms the benchmark and is measurable.
.
I’ve read some people suggest that the water flowing fully (taking up the whole orifice) is an indication that the flow is good, but my radiator, even with the clogged passages was able to do this. So I’m theorizing that that indication in itself is not an adequate indication for a performance engine.
Here's we're filling the rad from the bottom to do a flow test. When the water spews out the top for a second, let go and see how far the water jets from the bottom.  Photo by Challen

Here we’re filling the rad from the bottom to do a flow test. When the water spews out the top for a second, let go and see how far the water jets from the bottom. Photo by Challen

For a fragile radiator, heating up the upper tank to do rodding is not as desirable as it could damage the core, and fragile or thinned tubes could be damaged by rodding. This wasn’t the case for my radiator as it had plenty of strength for rodding but if good results can be had by hot tanking, it is much less risky and easier.
.
Considering that I most likely have some weird leprosy-like condition in the engine block waiting for an engine rebuild to solve, I was glad I didn’t buy a 500-700 dollar radiator just to get clogged up by the fallout. (I sure would like to get one of those 4 row high efficiency radiators though – some other time). Also, I just became aware that my radiator yoke, the crossmember is for a 22 unch radiator and someone drilled wide to fit a 26 radiator. It’s cool, I’m not trying to create a show car.
 .
It’s still possible that crud in the block could still cause overheating problems even with a clear radiator.
.
What they suggested to clear out the block without popping the freeze plugs, is what one did with his old Mustang that had cooling system leprosy: he made some high speed runs (150 mph) with an upper hose filter plus no thermostat and flushed his cooling system after each run to resolve his overheating problem. Whether he actually did 150mph or not, well… I get the idea.
Copper screen to be used as a crud catcher before the crud goes into the radiator (at least the big chunks). Photo by Challen

Copper screen to be used as a crud catcher before the crud goes into the upper radiator (at least the big chunks). Photo by Challen

This little education highlights a very important and unheralded aspect of engine rebuilding, renovation and  resolving cooling problems especially since we’re often dealing with over 40 year old technology or old blocks. Some additional attention can be given to your old muscle car’s long term maintenance if its stuck in a shop for a while, especially if the freeze plugs are ever easily accessible and you suspect a cooling problem or not, you pop them off and flush out your block of crud that is likely building up on your old Mopar.
 .
For the next engine rebuild, I’ll be giving careful attention to the cooling passages and any new technology that can offset the flaking of the old cast iron. Is that one reason they used more nickel in some blocks now and before?
 .
Anyway, I hope the hot-tanked radiator will get the engine to run cooler.
 .
In the meantime, if you see me driving around town at 5000 rpm or more, you’ll know why –  “Yes sir, officer, I’m treating leprosy.”

*

If you enjoyed this post, please LIKE SHARE COMMENT

The Dodge Kid in his youth about 1976. I think I wore this hat everyday through my Freshman year in high school. Photo by Nick Yee

The Dodge Kid in his youth about 1976.

Copyright © 2014 ChallenYee.com. TheDodgeKid.com  All Rights Reserved.